
How to Organize Your Kitchen for Spring Cooking
Contents
- Introduction
- Overview
- 1. Declutter Your Kitchen Space
- 2. Organize Your Pantry for Fresh Ingredients
- 3. Create a Dedicated Spring Cooking Zone
- 4. Optimize Your Fridge for Freshness
- 5. Streamline Your Cooking Tools
- 6. Refresh Your Spice Collection
- 7. Maximise Counter Space
- 8. Invest in Quality Storage Solutions
- 9. Create a Meal Prep Station
- 10. Add Personal Touches
- Conclusion
Introduction
Spring brings a wave of freshness—crisp produce, vibrant herbs, and a desire for lighter, brighter meals. But to fully embrace the season’s culinary potential, your kitchen needs more than just enthusiasm; it needs intentional organization. A cluttered, disorganized space can turn even the simplest spring recipe into a chore, while a streamlined kitchen becomes a canvas for creativity. Whether you’re whipping up a salad with just-picked greens, simmering a light soup with seasonal vegetables, or baking a fruit tart with ripe berries, an organized kitchen ensures every step feels effortless. This guide will walk you through 10 actionable steps to transform your kitchen into a spring-ready hub, where fresh ingredients shine and cooking becomes a joy, not a hassle.
Overview
Organizing your kitchen for spring cooking is about more than tidiness—it’s about creating a space that aligns with the season’s needs: easy access to fresh produce, versatile tools for light meals, and a layout that inspires spontaneity. The following 10 steps will help you declutter unnecessary items, categorize essentials, design dedicated zones for spring-specific ingredients, optimize storage in pantries and fridges, streamline tools, refresh spices, maximize counter space, invest in smart storage solutions, set up a functional meal prep station, and add personal touches that make the space feel uniquely yours. By the end, your kitchen will not only look 整洁 but will work with you, turning spring’s bounty into delicious, stress-free meals.
1. Declutter Your Kitchen Space
Before organizing, you need to clear the slate. A cluttered kitchen hides what you need and creates mental fatigue—exactly what you want to avoid when cooking with spring’s fresh ingredients.
Start with a Full Empty-Out
Begin by removing everything from cabinets, drawers, and countertops. Yes, everything. This might feel overwhelming at first, but it’s the only way to truly assess what you own. As you empty, place items in temporary piles (on the dining table or counter) to avoid mixing them up.
The 3-Question Filter
For every item, ask yourself three critical questions to decide its fate:
- Do I use it regularly (at least once a month) for spring or year-round cooking?
- Is it in good condition? (No cracks, rust, or broken parts that make it unsafe or inefficient.)
- Does it add value? (Either by making cooking easier, sparking joy, or serving a unique purpose no other item can.)
If the answer to all three is “no,” it’s time to let it go.
Sort and Categorize
After filtering, group the items you’re keeping by function. For example:
- Baking tools (muffin tins, rolling pins, cookie cutters)
- Cooking utensils (spatulas, ladles, peelers)
- Serveware (platters, bowls, salad tongs)
- Small appliances (toaster oven, blender, food processor)
This step ensures you’ll know exactly where to store each category later.
2. Organize Your Pantry for Fresh Ingredients
The pantry is the backbone of your kitchen, and in spring, it should prioritize easy access to grains, canned goods, and baking essentials that complement fresh produce.
First, Purge Expired Items
Remove every item from your pantry shelves and check expiration dates. Stale cereals, rancid oils, and expired canned goods (yes, even canned food goes bad!) have no place in a spring-ready kitchen. Wipe down shelves with a mild cleaner to remove crumbs and spills—this prevents pests and keeps your pantry smelling fresh.
Categorize with Purpose
Group items into categories that make sense for spring cooking. Here’s a breakdown with examples:
- Grains & Pasta: Quinoa, rice, farro, whole-wheat pasta, and couscous. Store these in airtight, clear containers (glass or BPA-free plastic) to keep out moisture and pests—you’ll instantly see when you’re running low.
- Canned & Jarred Goods: Sub-categorize into beans (black, chickpeas), tomatoes (diced, crushed), broths (vegetable, chicken), and condiments (salsa, artichoke hearts). Arrange them by use-by date, so older items are in front.
- Snacks: Dedicate a shelf or basket to spring-friendly snacks like dried fruit, nuts, rice cakes, and whole-grain crackers—perfect for quick, light bites.
- Baking Essentials: Flour, sugar (white, brown), baking soda, baking powder, and vanilla extract belong together. Label each container with the date you opened it (flour, for example, stays fresh for 6–8 months).
Label Everything Clearly
Use waterproof labels or a chalk marker to note contents and expiration dates on containers. Place labels at eye level so you can scan shelves quickly. This simple step saves time on grocery runs and prevents buying duplicates of items you already have.
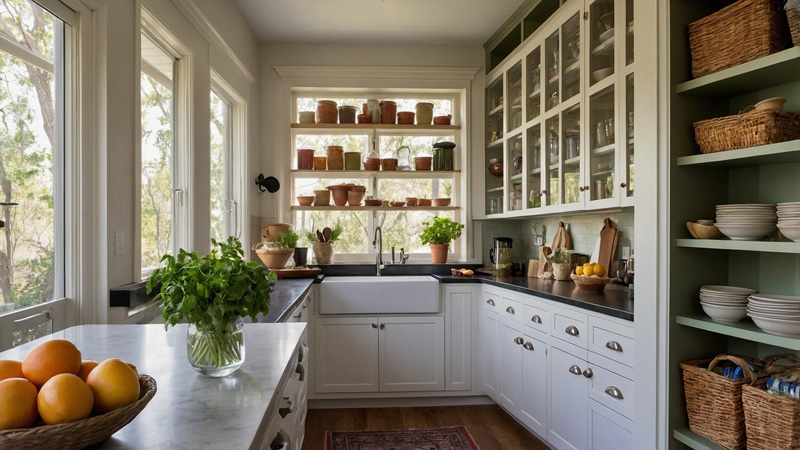
3. Create a Dedicated Spring Cooking Zone
Spring cooking thrives on fresh, seasonal ingredients—think herbs, berries, asparagus, and peas. A dedicated zone ensures these items are always within reach, making impromptu meals a breeze.
Choose the Right Location
Pick a spot that’s bright, accessible, and close to your main cooking area (near the stove or countertop). A windowsill, a corner of the counter, or a small shelf works well—aim for a space with natural light to keep herbs happy and visible.
Stock It with Spring Essentials
Fill your zone with items that fuel seasonal cooking:
- Fresh Herbs: Grow basil, mint, parsley, and chives in small pots on the windowsill—snip as needed for salads, sauces, or garnishes.
- Seasonal Recipes: Keep a binder or digital tablet with spring recipes (think lemon herb chicken, strawberry spinach salad, or asparagus risotto) or stack cookbooks like The Spring Cookbook or Fresh: 100+ Light Meals nearby.
- Produce Storage: Use a woven basket or wooden tray for ripe fruits (berries, peaches) and vegetables (radishes, cherry tomatoes)—it adds a rustic touch and keeps produce from getting lost in the fridge.
Keep It Flexible
As spring progresses, swap items to match what’s in season. In early spring, focus on root vegetables and greens; by late spring, shift to berries and stone fruits. This adaptability keeps your zone relevant all season long.
4. Optimize Your Fridge for Freshness
A disorganized fridge can turn crisp spring produce into wilted waste. With strategic organization, you’ll extend the life of your ingredients and reduce food waste.
Deep Clean First
Empty your fridge completely. Toss expired leftovers, moldy fruits, and soured dairy. Remove shelves and drawers, and wash them with warm, soapy water—pay special attention to sticky spills (maple syrup, jam) that attract bacteria. Dry everything thoroughly before putting it back.
Zone Your Fridge by Temperature and Use
Fridges have varying temperatures (warmer at the top, colder at the bottom)—use this to your advantage:
- Top Shelf: Ready-to-eat foods like spring salads, pre-cut veggies, and bottled drinks. Keep leftovers in clear containers here, labeled with dates, so they’re easy to spot.
- Middle Shelves: Dairy (yogurt, goat cheese, milk) and eggs—these need consistent, moderate temperatures. Avoid the door (it’s the warmest spot!) for dairy, as temperature fluctuations speed up spoilage.
- Bottom Shelf: Raw meats, poultry, and fish. Store them in sealed containers to prevent juices from dripping onto other foods (a major cross-contamination risk).
- Crisper Drawers: Most fridges have two drawers—use one for fruits (apples, berries) and one for vegetables (lettuce, asparagus). Adjust humidity settings: veggies need high humidity (to stay crisp), while fruits prefer low humidity (to slow ripening).
Use Bins and Dividers
Clear, stackable bins are a fridge game-changer. Use them to corral:
- Snack-sized veggies (carrot sticks, bell pepper slices)
- Condiments (mustard, hot sauce, vinaigrettes)
- Small fruits (grapes, cherry tomatoes)
Drawer dividers can separate leafy greens from firmer veggies like broccoli, so you don’t have to dig through a jumble to find what you need.
5. Streamline Your Cooking Tools
Spring cooking calls for simplicity—heavy, specialized tools (like a giant slow cooker or a novelty waffle iron) often sit unused. Streamlining your tools ensures you only keep what serves you.
Audit Your Tools with the “Spring Test”
Ask: Does this tool make spring cooking easier? For example, a large stockpot is great for winter stews but rarely needed for spring’s quick sautés or salads. A lightweight sauté pan, however, is indispensable. Be ruthless: if you haven’t used a tool in 6 months, donate or sell it.
Essentials for Spring
Keep these tools within arm’s reach—they’ll handle 90% of spring recipes:
- A sharp chef’s knife (8–10 inches) for chopping veggies and herbs.
- A medium-sized non-stick skillet (10–12 inches) for omelets, sautéed greens, or pan-seared fish.
- A small saucepan for heating sauces or blanching asparagus.
- Utensils: silicone spatula (gentle on non-stick pans), tongs (for flipping), and a whisk (for dressings).
- A cutting board (preferably wood or bamboo, which is gentle on knife blades).
Store for Accessibility
The goal is to grab tools without digging. Try these strategies:
- Hang frequently used utensils (spatula, tongs) on a magnetic strip or wall rack near the stove.
- Use drawer dividers to separate tools by type (knives in one section, spatulas in another).
- Store pots and pans vertically (using a rack) in a cabinet—this saves space and lets you pull out the one you need without lifting a stack.
6. Refresh Your Spice Collection
Spices elevate spring’s light flavors—think dill in potato salad, basil in pesto, or cumin in roasted vegetable bowls. But stale spices taste like nothing, so a refresh is non-negotiable.
Test for Freshness
Most spices stay potent for 6–12 months (ground spices) or 1–2 years (whole spices like cinnamon sticks). To check: Open the jar and smell. If the aroma is faint or nonexistent, it’s time to toss. For ground spices, look for faded color—dull red paprika or grayish black pepper is past its prime.
Organize for Easy Use
Choose a system that fits your cooking habits:
- Alphabetical: Ideal if you cook a wide range of cuisines—you’ll always find “turmeric” quickly.
- By Cuisine: Group spices used in Italian dishes (oregano, thyme, red pepper flakes) together, and same for Mexican (cumin, chili powder, coriander) or Asian (ginger, five-spice, star anise).
- By Frequency: Keep “workhorses” like salt, pepper, garlic powder, and dried basil on the counter or in a drawer near the stove. Less-used spices (saffron, sumac) can go in a cabinet.
Store Spices Properly
Light, heat, and moisture are spice enemies. Keep them in a cool, dark cabinet (not above the stove, where heat rises) in airtight jars. For extra protection, label each jar with the purchase date—this takes the guesswork out of freshness checks.
7. Maximise Counter Space
Cluttered counters make even simple tasks feel stressful. A clear counter is a blank canvas for chopping veggies, arranging a charcuterie board, or plating a spring salad.
Identify “Counter Hogs”
Appliances and gadgets that sit unused are the biggest culprits. That smoothie maker you used once in January? The bread box that’s always empty? These belong in cabinets or pantries. Keep only what you use daily on the counter.
Store Smartly
For appliances you use occasionally (like a blender for weekend smoothies), store them in a lower cabinet or on a pull-out shelf—easy to access but out of sight. Use vertical space: Install a shelf above the stove for small appliances, or hang a pot rack to free up cabinet space.
Curate Your Counter “Essentials”
Keep these items visible—they’re both functional and aesthetic:
- A knife block (with your sharpest knives).
- A small bowl of fresh fruit (lemons, limes, or apples).
- A jar of wooden spoons or a small caddy with frequently used utensils.
Avoid “decorative clutter” (like unused vases or random magnets)—they take up space and create visual noise.
8. Invest in Quality Storage Solutions
The right storage tools turn chaos into order. They don’t have to be expensive, but they should fit your kitchen’s layout and your habits.
Must-Have Storage Tools
- Clear Containers: Perfect for grains, flours, and snacks—you’ll see contents at a glance. Opt for square containers (they stack better than round ones).
- Drawer Dividers: Plastic or wooden dividers keep utensils, measuring spoons, and even small gadgets (can openers, vegetable peelers) from rolling around.
- Lazy Susans: These rotating trays work wonders in corner cabinets or fridge doors—spin to reach spices, condiments, or jars without rearranging everything.
- Baskets & Bins: Woven baskets add warmth and corral loose items (like napkins or tea bags) in pantries or under sinks.
Customize to Your Space
A small kitchen might benefit from over-the-door organizers (for spices or cleaning supplies), while a larger kitchen could use a rolling cart for extra counter space. Measure shelves and drawers before buying—nothing’s worse than a container that’s too tall for your pantry!
9. Create a Meal Prep Station
Spring is busy, but meal prep ensures you can enjoy fresh, home-cooked meals even on hectic days. A dedicated station makes prepping efficient and even enjoyable.
Choose the Right Spot
Set up your station near the fridge (for easy access to ingredients) and the sink (for quick cleanup). A 2–3 foot section of countertop is enough—if space is tight, use a foldable table or rolling cart.
Stock It with Prep Gear
Keep these items here permanently, so you’re never hunting for them:
- Cutting boards (one for veggies, one for meat—prevent cross-contamination).
- Measuring cups and spoons (dry and liquid).
- Mixing bowls (various sizes for marinating, tossing salads, or storing prepped ingredients).
- A food processor (small, compact models work best for chopping herbs or veggies).
Organize for Flow
Arrange items in the order you use them: measuring tools first, then cutting boards, then mixing bowls. Use a vertical file holder to store recipe cards or printouts, and keep a small trash bowl nearby to discard peels and scraps—no more trips to the garbage can mid-prep.
10. Add Personal Touches
A kitchen should feel like yours—personal touches make cooking more enjoyable and turn a functional space into a welcoming one.
Functional Decor
Hang colorful tea towels (choose patterns that scream spring: florals, pastels, or fruit prints).
Display a small potted plant (like a spider plant or aloe vera) on the windowsill—it adds life and purifies the air.
Use a decorative jar to store wooden spoons or a vintage tray to corral your coffee mugs.
Sensory Boosters
Keep a small bowl of citrus peels (lemon or orange) on the counter—they release a fresh, uplifting scent.
Play soft music or a podcast while cooking—make the space feel joyful.
Frame a favorite spring recipe (like your grandma’s strawberry shortcake) and hang it near your cooking zone for inspiration.
Seasonal Updates
Swap decor with the season: In early spring, use daffodils or tulips in a vase; by late spring, switch to wildflowers or herbs like rosemary. It’s a small change that keeps your kitchen feeling fresh.
Conclusion
Organizing your kitchen for spring cooking isn’t about perfection—it’s about creating a space that works for you. By decluttering, categorizing, and adding intentional touches, you’ll spend less time searching for tools or ingredients and more time savoring the season’s flavors. Whether you’re a seasoned cook or a beginner, these steps will turn your kitchen into a place where every spring meal—from a simple salad to a elaborate brunch—feels like a celebration. So roll up your sleeves, start with one step (decluttering is a great first move!), and watch as your kitchen transforms into a spring-ready haven. Happy cooking!
 Home Decor Ideas to Make Your Home Feel Like a Luxury Hotel
  Best Luxury Accent Lighting for Every Room
  Best Luxury Candles for a Cozy and Elegant Home
  Best Luxury Bed Frames for a Stylish Bedroom
  Best Luxury Bathroom Mirrors for a Stylish Touch
  Luxury Coastal Home Decor Ideas: Elevate Your Beach House with Timeless Elegance